How to Replace Batteries in Smart Security Systems
Alarm Systems, Security Sensors & Smart Home Devices
Is your alarm system showing a Low Battery? It is important to change the batteries in your security system as soon as you get a low battery notification to make sure the system continues to perform as it should.
Whether your alarm system is from DFW Security, ADT, Vivint or another security company, there are some basic steps needed to change the main battery, also known as the backup battery.
First, determine if your security system is a traditional alarm or a smart security system. If your alarm system has a touchscreen and/or you use a phone app to control it, it is probably a smart system. Traditional alarm systems are older and usually have rubber buttons instead of a touchscreen. This article gives detailed instructions on how to change the battery in a smart security system.
How to Change the Battery in a Smart Alarm System
This first set of instructions covers the Qolsys IQ2 panel, but the same basic steps apply to other smart systems like Qolsys IQ4, 2Gig, ADT, DSC and Honeywell.
First, Check the Power.
If you’re getting a low battery alert from your security system, the first thing to check is that the panel is plugged in. If your keypad is on a table stand, make sure it didn’t inadvertently get unplugged. When a touchscreen keypad is mounted on the wall, the power transformer for it is usually plugged in somewhere else in the house. These get accidentally unplugged all the time and run down the battery. In Texas, check the closet, garage or attic for transformers. Sometimes when it gets plugged back in, the battery will recharge without having to be replaced.

If the system is plugged in, but you’re still getting a low battery alert, verify the electrical outlet has power. You can plug in your cell phone charger or a lamp to ensure functionality. If the electrical outlet is working, proceed to the next step.
Next, Remove the Cover to Access the Battery.
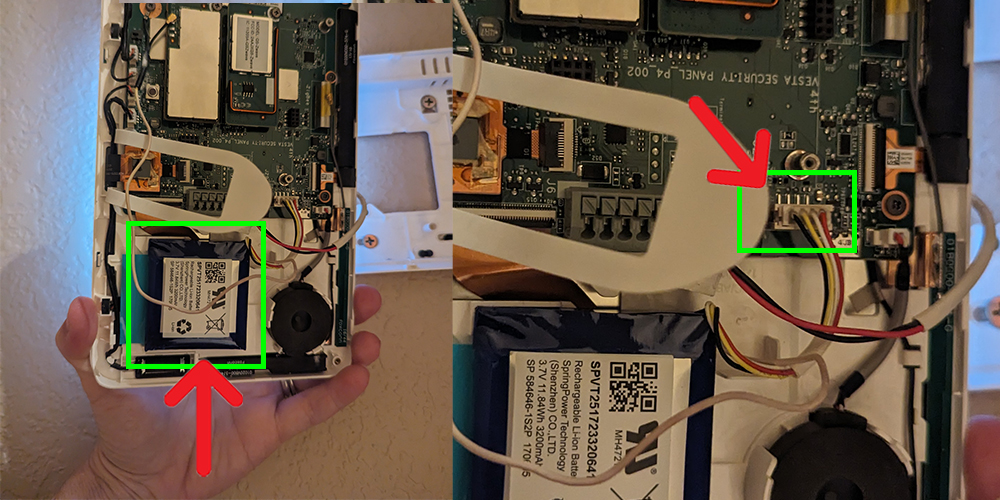
In “smart” alarm systems, the battery compartment is located inside the main keypad. Locate the two tabs on the bottom of the panel. While pushing in on the tabs, pull out and up to remove the face plate.

Disconnect the battery wire and remove the battery pack.

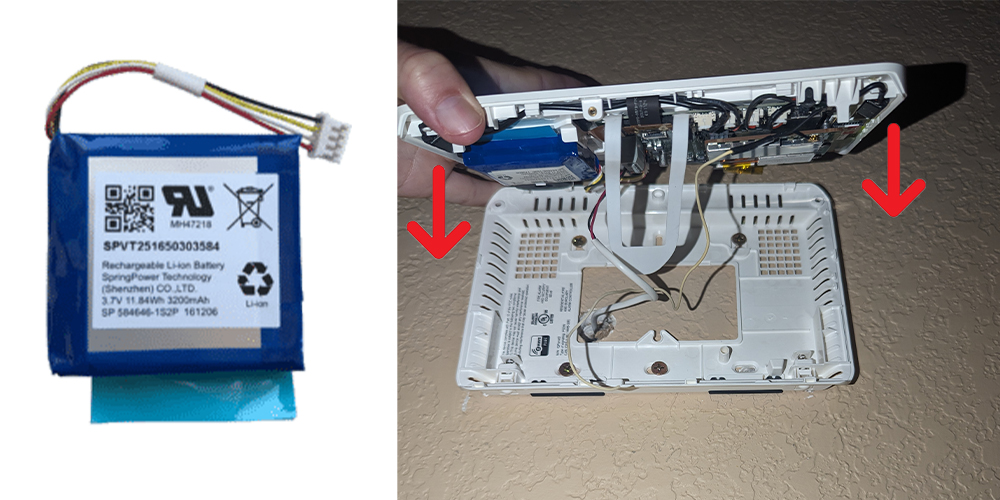
Once you’ve removed the keypad from its base, you can see the battery pack. Order a replacement of the same kind online or at a specialty battery store.
Insert the new battery pack and reconnect the wire plug.
To reattach the panel to its base, line up the top first, then lower it and click the bottom tabs back into place.

After replacing the backup battery in your smart security system, give it some time to register, then the low battery notification and tamper alert should clear. You might have to arm and disarm your system or log out and back into the app. If you’re still showing a low battery alert, check to see if it’s another security component that needs a new battery. Instructions for changing the batteries on other security system devices are up next.
How to Replace the Backup Battery in a 2Gig Security System
Step 1. Separate the keypad from its base.
Make sure the system is disarmed, then remove the screw at the top of the keypad using a Phillips head screwdriver. Press in with a flathead screwdriver on the two upper tabs as shown.

Step 2. Locate the battery pack and purchase the same type of battery online or from a specialty battery store in Dallas or Fort Worth if you haven’t already.
Step 3. Detach the wire plug. Remove the old battery. Replace it with the new battery and reconnect the wire plug.

Step 4. Reattach the keypad to its base by inserting the bottom first. Line up the upper tabs and click the top into place. Insert the screw and wait for the low battery trouble condition to clear.
If the trouble signal doesn’t clear, there could be another issue. Make sure the battery is connected properly and the keypad is securely attached to its base. If the problem persists, see if another component requires a new battery. Instructions for replacing batteries in common alarm system devices start below.
How to Change the Batteries in Door Sensors (and Window Sensors)
Learn how to put new batteries in your security system door or window sensors. These instructions work for IQ, 2Gig, DSC, Honeywell, and Power G sensors commonly installed in the Dallas area, as well as brands like Ring, ADT, Nest and Simplisafe.
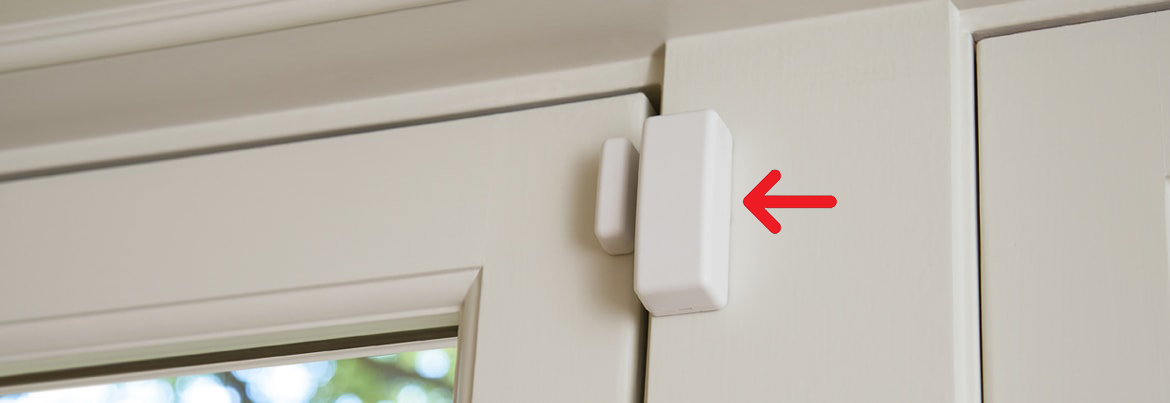
Step 1. Look for the 2-piece wireless sensor on your door or window frame.

If you can’t find sensors that look like the one pictured above, look in the door jamb. You may have a recessed or plunger style sensor like the ones pictured below. These types of door or window sensors could be wireless, or they could be hardwired contacts that don’t need batteries.

Step 2. Make sure your alarm system is disarmed.
Step 3. Find the tab on the sensor (the larger piece, not the smaller magnet) and use a screwdriver, coin or fingernail to open the contact.

Step 4. Remove the batteries and replace them with new batteries of the same kind. Note: Our example here uses two CR2032. These batteries can be purchased at almost any store, often located by the hearing aid batteries.
Step 5. Replace the cover.
Step 6. Check your alarm system to ensure that the low battery error has cleared. It is normal to see a tamper message while you’re changing the batteries, but it should clear by itself about a minute after you’re done. If you still see a trouble or tamper message after changing the batteries, you may have to acknowledge the error to clear it.
If your alarm panel is showing the door or window is open, you may have inadvertently knocked off the magnet or moved it too far away from the sensor. Make sure the magnet and sensor are right next to each other when the door or window is closed like the example below.

How to Put New Batteries in Monitored Smoke Detectors
If you’re getting a low battery alert on your alarm system for a smoke detector, first find the ones that are connected to your alarm system. Regular builder-installed smoke detectors in Dallas look like the picture on the left and are not monitored. You probably have a lot of them all over your house. The smoke detector pictured on the right is a monitored detector. Most people only have a couple of this type in their homes, possibly only one per level.

Step 1. Twist the detector slightly (about a half-inch) clockwise to release it from its base.
Step 2. Slide the battery cover up the reveal the batteries.
Step 3. Replace the old batteries with new ones of the same kind.
Step 4. Slide the battery cover back in place.
Step 5. Line up the notch on the smoke detector with the arrow on its base. Twist counterclockwise to lock it back onto the base.

Step 6. Make sure the low battery error clears on your alarm system.
If the tamper signal doesn’t go away, check that the detector is fully attached to the base. If that doesn’t fix it, it’s possible you will need to replace the smoke detector. Call your security provider for help.
If your smoke detectors are beeping after a battery change, it’s probably a different detector, and most likely one that is not connected to your alarm system, as most monitored smoke detectors don’t beep.
How to Replace the Batteries in Yale Smart Locks
If you’re getting a low battery notification for your Yale smart lock, changing the battery is easy. For Real Living locks go to the inside of the door on the deadbolt side. Use a crosshead screwdriver to remove the cover as pictured below. If you don't see a screw, scroll down to our instructions for a different version of smart lock. Otherwise, remove and replace the 4 AA alkaline batteries and reinstall the cover. Easy peasy!

The newer version of Yale Smart lock being installed in Dallas-Fort Worth is a little more complicated than the older versions, but it's still relatively easy to change the battery.
Step 1. Locate the tiny pin hole in the top of the lock on the inside of the door. Use a pin, paper clip or other small pointy object to press down in the hole as pictured below.
Step 2. While pressing down in the pin hole, squeeze the outer edges and pull the cover toward you to remove it and reveal the battery compartment.
Step 3. Insert the new AA batteries.
Step 4. To put the cover back on, line the bottom up first and then close it until the tabs on the top click into place. Press on the cover to ensure it is locked in. Wait for the low battery signal to clear and you're all done!

How to Replace the Batteries in Schlage Smart Locks
Step 1. Slide the cover up to remove it.
Step 2. Gently unsnap the clip connector from the battery pack.
Step 3. Pull up from the top to remove the battery pack.
Step 4. Replace the batteries with 4 new AA alkaline batteries.
Step 5. Snap the clip connector back onto the battery pack. Slide it back down into the lock with the batteries facing the door.
Step 6. Replace the cover.

How to Change the Batteries in Smart Garage Doors
Not much has changed since I wrote about this in 2016. Click on the link to learn how to change the batteries in your Linear or MyQ smart garage controller.
How to Replace the Battery in your Smart Garage Controller
How to Change the Batteries in a Glassbreak Detector
If your alarm system is telling you the battery is low in your glassbreak detector, you’ll want to change it as soon as possible. These instructions are for a 2Gig brand, but the steps are basically the same for all wireless glassbreaks, like ADT, Vivint, DSC, Qolsys, Honeywell and more.
Step 1. Locate the Glassbreak Detector. They are usually mounted on the ceiling somewhere within 15 feet of the windows they are protecting.

Step 2. Grip the glassbreak detector on the sides and twist slightly (less than ½ inch) to remove it from its base.
Step 3. Identify the size and type of batteries that are needed and replace them with matching new ones.
Step 4. Re-attach the detector to its base by lining up the notches as pictured above, pressing it onto the base, and then gently twisting the pieces back together.
Note: When you remove the glassbreak detector from its base, your alarm system could show a tamper signal. This should clear automatically once you put it back together.

If your security panel still shows a tamper alert after replacing the batteries, it could mean either 1) you didn’t re-attach the glassbreak detector properly or 2) you need to acknowledge the alert on your keypad to make it go away. If you’re still having problems, call your security provider for help.
Device still not working after battery change?
If you are a DFW Security customer, give us a call! Our technical support agents can either help you over the phone or schedule a technician to visit your property in the Dallas area. If your alarm system isn’t working after a battery change, here is a checklist for some additional steps you can try:
- -Acknowledge the notification on your alarm keypad to clear the trouble signal.
- -Make sure the batteries installed are the correct kind and are installed the correct way.
- -Wait - Sometimes it can take a while before the low battery signal goes away.
- -Check to see if a different device is triggering the alert. Sometimes zones get mislabeled.
- -Try to logout and then back into your app.
- -Try to arm and disarm your security system.
- -Make sure the transformer for your alarm system is plugged into a working outlet.
- -If your smoke detector is beeping, it could be one that is not connected to the alarm system. Find it and change the battery.
- -Make sure all the doors and windows are closed, and that you’re not moving in front of a motion detector.
- -Power cycle your alarm system. Power it down completely, wait 30 seconds, then turn it back on.
Where can I buy batteries for my alarm system?
Replacement batteries for most alarm systems can be purchased online or at a specialty battery store.
Batteries for wireless alarm system components like door sensors, glassbreak detectors, smoke detectors, smart locks and smart garage controllers can be purchased at major retail stores, online or at specialty battery stores throughout Texas.


